我使用的是myEclipse8.6版本
1.首先导入struts2的jar包和插件包(在下载的struts-2.2.1.1-all/struts-2.2.1.1/apps/struts2-blank/WEB-INF/lib下所有jar包 和struts-2.2.1.1-all/struts-2.2.1.1/lib/struts2-spring-plugin-2.2.1.1.jar)
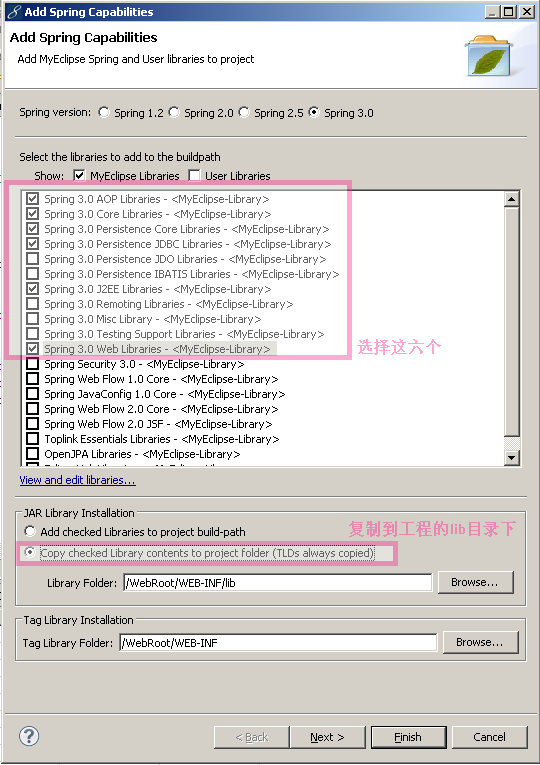
2.使用myEclipse8.6自带的功能引入spring3.0的jar包
3.加入ehcache-1.6.0.jar,ibatis-2.3.0.677.jar,(网上自己下载)
ojdbc14.jar,org.springframework.context.support-3.0.0.RELEASE.jar
接下来是配置文件:
web.xml:
<!-- 读取spring配置文件 -->
<context-param>
<param-name>contextConfigLocation</param-name>
<param-value>
classpath:applicationContext.xml
classpath:cacheContext.xml
</param-value>
</context-param>
<listener>
<listener-class>org.springframework.web.context.ContextLoaderListener</listener-class>
</listener>
<!-- struts 过滤器 -->
<filter>
<filter-name>struts2</filter-name>
<filter-class>org.apache.struts2.dispatcher.ng.filter.StrutsPrepareAndExecuteFilter</filter-class>
</filter>
<filter-mapping>
<filter-name>struts2</filter-name>
<url-pattern>/*</url-pattern>
</filter-mapping>
struts.xml:
因为有struts2-spring-plugin-2.2.1.1.jar
所有我可以写Action的全路径(com.jungle.action.UserAction)而不用在applicationContext.xml中配置Action
<struts>
<constant name="struts.devMode" value="true" />
<package name="user" extends="struts-default" namespace="/user">
<action name="user" class="com.jungle.action.UserAction">
<result>/index.jsp</result>
</action>
</package>
</struts>
applicationContext.xml:
<?xml version="1.0" encoding="UTF-8"?>
<beans xmlns="http://www.springframework.org/schema/beans"
xmlns:xsi="http://www.w3.org/2001/XMLSchema-instance" xmlns:aop="http://www.springframework.org/schema/aop"
xmlns:context="http://www.springframework.org/schema/context" xmlns:tx="http://www.springframework.org/schema/tx"
xsi:schemaLocation="http://www.springframework.org/schema/beanshttp://www.springframework.org/schema/beans/spring-beans-2.5.xsd
http://www.springframework.org/schema/tx
http://www.springframework.org/schema/tx/spring-tx-2.5.xsd
http://www.springframework.org/schema/aop
http://www.springframework.org/schema/aop/spring-aop-2.5.xsd
http://www.springframework.org/schema/context
http://www.springframework.org/schema/context/spring-context-2.5.xsd">
<!--
配置文件读取 需 要加入applicationContext.properties文件<bean
id="propertyConfigurer"
class="org.springframework.beans.factory.config.PropertyPlaceholderConfigurer">
<property name="locations"> <list>
<value>classpath:applicationContext.properties</value> </list>
</property> </bean>
-->
<!-- 支持元注释 -->
<context:annotation-config />
<!-- 扫描包目录 -->
<context:component-scan base-package="com"></context:component-scan>
<!-- 数据源 -->
<bean id="dataSource" class="org.apache.commons.dbcp.BasicDataSource"
destroy-method="close">
<property name="driverClassName" value="oracle.jdbc.driver.OracleDriver" />
<property name="url" value="jdbc:oracle:thin:@localhost:1521:oracle" />
<property name="username" value="chenl" />
<property name="password" value="chenl" />
</bean>
<!-- 大字段 -->
<bean id="lobHandler" class="org.springframework.jdbc.support.lob.DefaultLobHandler" />
<!-- ibatis 必须 因为需要读取配置文件 classpath:sqlmap-config.xml -->
<bean id="sqlMapClient" class="org.springframework.orm.ibatis.SqlMapClientFactoryBean">
<property name="configLocation" value="classpath:sqlmap-config.xml" />
<property name="dataSource" ref="dataSource" />
<property name="lobHandler" ref="lobHandler"></property>
</bean>
<!-- 1.第一种方式(必须使用注解的方式@Resource) : 自定义一些方法 如queryForString,queryForBoolean等 -->
<bean id="mySqlMapClientDaoSupport" class="com.jungle.dao.common.MySqlMapClientDaoSupport">
<property name="dataSource" ref="dataSource" />
<property name="sqlMapClient" ref="sqlMapClient" />
</bean>
<!-- 2.第二种方式(必须使用注解的方式@Resource),使用get,set方式需要使用接口的方式才行-->
<bean id="sqlMapClientTemplate" class="org.springframework.orm.ibatis.SqlMapClientTemplate">
<property name="dataSource" ref="dataSource" />
<property name="sqlMapClient" ref="sqlMapClient" />
</bean>
</beans>
ibatis的配置文件(sqlmap-config.xml)
<?xml version="1.0" encoding="UTF-8"?>
<!DOCTYPE sqlMapConfig
PUBLIC "-//ibatis.apache.org//DTD SQL Map Config 2.0//EN"
"http://ibatis.apache.org/dtd/sql-map-config-2.dtd">
<!-- ibatis配置文件 -->
<sqlMapConfig>
<settings
cacheModelsEnabled="true"
enhancementEnabled="true"
lazyLoadingEnabled="true"
errorTracingEnabled="true"
maxRequests="512"
maxSessions="128"
maxTransactions="32"
useStatementNamespaces="true"
/>
<!-- 引入xml文件 -->
<sqlMap resource="com/jungle/dao/config/common.ibatis.xml" />
</sqlMapConfig>
common.ibatis.xml:
<?xml version="1.0" encoding="UTF-8" ?>
<!DOCTYPE sqlMap PUBLIC "-//ibatis.apache.org//DTD SQL Map 2.0//EN" "http://ibatis.apache.org/dtd/sql-map-2.dtd">
<!-- 例子 -->
<sqlMap namespace="common">
<typeAlias alias="user" type="com.jungle.dao.entity.User" />
<resultMap id="resultUser" class="com.jungle.dao.entity.User">
<result column="NID" property="nid" />
<result column="PASSWORD" property="password" />
<result column="USERNAME" property="username" />
</resultMap>
<!-- 查询一个User-->
<select id="getSingleUser" parameterClass="string" resultMap="resultUser">
<!--[CDATA[
select nid,username,password
from t_user
where nid = #nid#
ORDER BY nid
]]>
</select>
<!-- 查询出列表 -->
<select id="getUserList" resultMap="resultUser">
<![CDATA[
select nid,username,password
from t_user
ORDER BY nid
]]-->
</select>
</sqlMap>
因为web.xml中有加入classpath:cacheContext.xml 这是缓存的文件
所以必须在src下加入cacheContext.xml和ehcache-application.xml两个文件
ehcache-application.xml:(这个文件中最好不要加中文和注释否则可能会有问题)
<?xml version="1.0" encoding="UTF-8"?>
<ehcache xmlns:xsi="http://www.w3.org/2001/XMLSchema-instance" xsi:noNamespaceSchemaLocation="http://ehcache.org/ehcache.xsd">
<diskStore path="java.io.tmpdir"/>
<cacheManagerEventListenerFactory class="" properties=""/>
<defaultCache maxElementsInMemory="10000" eternal="false" timeToIdleSeconds="120" timeToLiveSeconds="120" overflowToDisk="true" diskSpoolBufferSizeMB="30" maxElementsOnDisk="10000000" diskPersistent="false" diskExpiryThreadIntervalSeconds="120" memoryStoreEvictionPolicy="LRU"/>
<cache name="coreCache"
maxElementsInMemory="3" eternal="true" overflowToDisk="false"/>
</ehcache>
cacheContext.xml:
<?xml version="1.0" encoding="UTF-8"?>
<beans xmlns="http://www.springframework.org/schema/beans" xmlns:xsi="http://www.w3.org/2001/XMLSchema-instance"
xmlns:jee="http://www.springframework.org/schema/jee" xmlns:tx="http://www.springframework.org/schema/tx"
xmlns:context="http://www.springframework.org/schema/context"
xsi:schemaLocation="http://www.springframework.org/schema/beanshttp://www.springframework.org/schema/beans/spring-beans-2.5.xsdhttp://www.springframework.org/schema/txhttp://www.springframework.org/schema/tx/spring-tx-2.5.xsdhttp://www.springframework.org/schema/jeehttp://www.springframework.org/schema/jee/spring-jee-2.5.xsdhttp://www.springframework.org/schema/contexthttp://www.springframework.org/schema/context/spring-context-2.5.xsd"
>
<!--缓存-->
<bean id="cacheManager" class="org.springframework.cache.ehcache.EhCacheManagerFactoryBean">
<property name="configLocation">
<value>classpath:ehcache-application.xml</value>
</property>
</bean>
<!--核心缓存
使用时:
@Resource
private Cache coreCache-->
<bean id="coreCache" class="org.springframework.cache.ehcache.EhCacheFactoryBean">
<property name="cacheManager">
<ref local="cacheManager"/>
</property>
<property name="cacheName">
<value>coreCache</value>
</property>
</bean>
</beans>
配置文件完成了。
接下来看看如何使用:
UserDaoImpl:
@Component("userDao")
public class UserDaoImpl implements UserDao {
// 使用get,set方式不行 ,因为SqlMapClientTemplate不是接口
@Resource
private SqlMapClientTemplate sqlMapClientTemplate;
@Resource
private MySqlMapClientDaoSupport mySqlMapClientDaoSupport;
UserAction:
public class UserAction extends ActionSupport {
@Resource
private UserDao userDao;
@Override
public String execute() throws Exception {
System.out.println(userDao.getUser("1"));
return SUCCESS;
}
}
PS:原来是有加xml的格式的 可是IE一查看就卡死 所以这里XML才全部没有套格式。
分享到:


相关推荐
struts2+ibatis2.x+spring2.5整合的一个demo 适合新手学习
struts2+spring+Ibatis框架包
SSI框架整合(Struts2.1+Spring3.0+Ibatis 2.3) 下载之后执行.sql文件创建表和sequence 记得改数据库访问地址以及数据库登录用户名密码 项目访问路径 localhost:8080/SSI_Demo1 一个简单的例子(Oracle数据库增删改查...
SSI项目实例,采用struts2.18+spring2.5+ibatis2.3实现,帮助需要帮助的朋友
本人主要是项目的SSI环境的搭建及登录功能,并不是完整的一套ERP系统,里面有相关文档,你可以根据相关文档继续开发学习!
MyEclispse下SSI整合JAR包(Struts1+Spring3+ibatis2)
自学两天ibatis后自己做的struts2+spring+ibatis+jquery ajax的登录注册
struts2+spring+ibatis做的增删改查的小例子 struts2+spring+ibatis SSI2整合 struts2+spring+ibatis增删改查 对初学者很有为、用
struts2.1.8+spring3.0+ibatis2.3优雅框架 sorry包有点大没能上传,见附件截图
Spring3.2.1+struts2.3.15.1+mybatis3.2.2 集合jar包 测试能用,整个包比较精简。基本没有多余的包。 里面带了commons-configuration-1.9.jar(操作xml文件的公共类包,很实用很强大,它依赖的commons-lang-2.3.jar...
Struts2+Spring+Ibatis+Ext,ext光是实现了登陆! 业务主要是简单的实现了两张表的增删改查!还有对查询的结果了Ibatis的分页,据库是Sql Server 2000!
Struts2+Spring+iBatis整合的一个小例子。 包括了对MySQL数据库的增删改查,只适用于新手,使用时请先把ssi.sql文件导入数据库。 压缩包内有源码和所需jar包
struts2+spring+ibatis 项目 入门使用 CRUD
基于struts2.2+spring3.1+Mybatis3.1(SSI框架)框架开发下的JAR包整合!
一个基于struts2.18+spring2.5+ibatis2.3的SSI项目示例。需要的jar包自己添加
struts+spring+maven+mybatis的整合,里面的图片是需要整合的oracle数据库,若有什么问题请联系我
struts2 + spring2.5 + ibatis2.3.4整合包文件,包括了SSI框架整合开发所需的全部文件
Struts2.0+Springframework2.5+ibatis2.3完美整合用户登录及增删改查示例
struts2+spring+ibatis整合加用户增加改查操作,包括所有需要的包
SSI(struts2+iBatis+spring2) 一个小的案例 注意 数据库是ORACLE 里面包含了(struts2+iBatis+spring2)的所有Jar包